
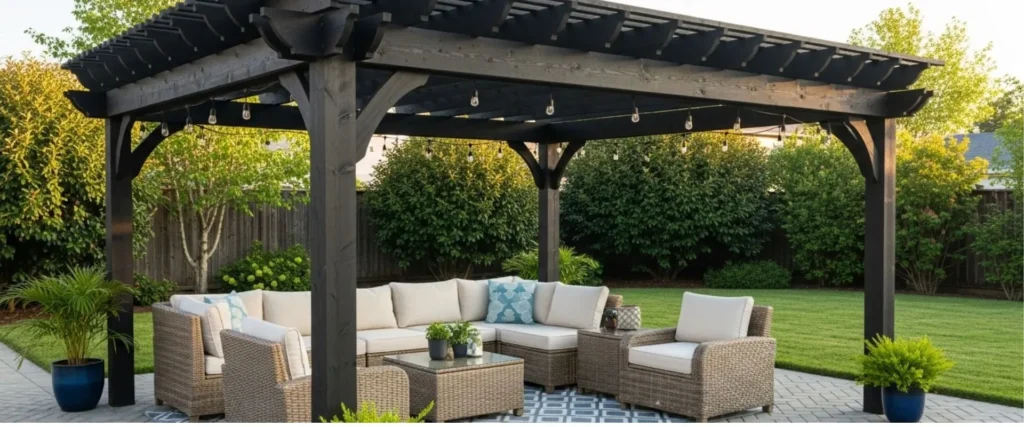
Installing a pergola on pavers creates a stunning focal point for your outdoor space, but proper anchoring is essential for safety and longevity. Many homeowners worry about securing their pergola without damaging their beautiful paver patio or compromising stability. The good news? With the right techniques and tools, you can achieve a rock-solid installation that protects both your investment and your family.
At Wood Kingdom West, we’ve helped Long Island homeowners create beautiful outdoor spaces for over 35 years. This comprehensive guide will walk you through every step of anchoring your pergola to pavers, from planning to final installation.
Why Proper Pergola Anchoring Matters
Before diving into the how-to steps, understanding why proper anchoring is crucial will help you appreciate each part of the process. Pergolas face constant exposure to wind, rain, and seasonal temperature changes. Without secure anchoring, these forces can cause your structure to shift, wobble, or even topple over.
Wind loads pose the biggest threat to unsecured pergolas. Even moderate winds can create significant uplift forces, while strong storms can turn an unanchored pergola into a dangerous projectile. Proper anchoring distributes these forces safely into the ground, keeping your pergola stable in all weather conditions.
Additionally, most building codes require permanent structures like pergolas to meet specific anchoring requirements. Following proper installation methods ensures your pergola meets local safety standards and won’t cause issues if you sell your home.
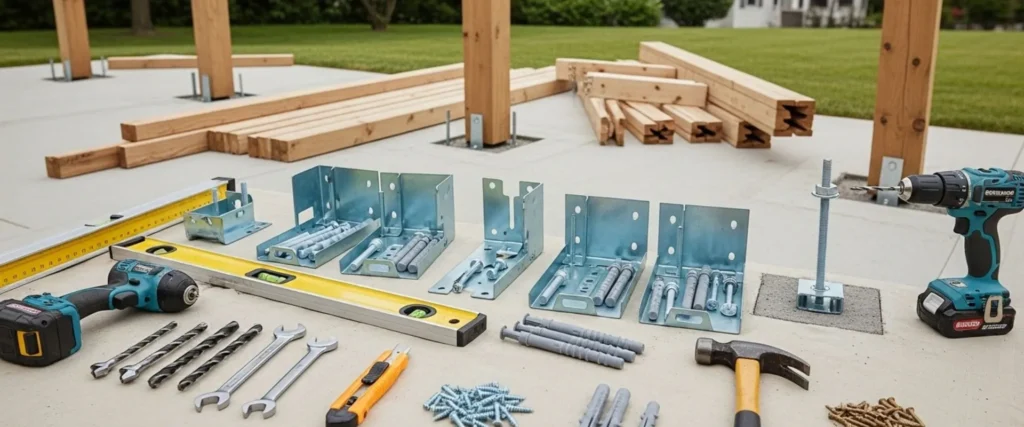
Tools and Materials You’ll Need
Gathering the right tools and materials before starting will make your pergola anchoring project much smoother. Here’s your complete shopping list:
Essential Tools:
- Hammer drill with masonry bits
- Level (at least 4 feet long)
- Measuring tape
- Chalk or pencil for marking
- Socket wrench set
- Safety glasses and gloves
- Vacuum or shop vac for debris removal
Required Materials:
- Concrete anchors (wedge anchors work best for this application)
- Galvanized lag bolts
- Metal post brackets or pergola base plates
- Construction adhesive rated for outdoor use
- Galvanized washers
- Silicone sealant
The quality of your anchors directly impacts your pergola’s stability. Stainless steel or hot-dip galvanized anchors resist corrosion and maintain their holding power for decades. Avoid basic steel anchors that can rust and fail over time.
Step-by-Step Pergola Anchoring Process
1. Planning Your Layout
Start by determining the exact placement of your pergola posts. Most pergolas require four anchor points, one for each corner post. Use your measuring tape to mark the precise location of each post, ensuring your layout is perfectly square.
Check that your planned placement allows adequate clearance from property lines, overhead power lines, and existing structures. Many areas require pergolas to be at least 3 feet from property boundaries.
2. Preparing the Paver Surface
Clean the paver surface thoroughly where each post will sit. Remove any dirt, debris, or loose material that could interfere with proper anchor installation. If your pavers have sand joints, you may need to remove some sand around the anchor points.
Inspect each paver for cracks or damage. Damaged pavers won’t provide reliable anchor support and should be replaced before proceeding. This step is crucial for long-term pergola stability.
3. Marking Anchor Points
Position your pergola posts or base plates in their final locations and mark the anchor hole positions. Double-check all measurements and ensure posts are perfectly aligned. Most pergola posts require 2-4 anchor bolts each, depending on the post size and local wind conditions.
Use chalk or a pencil to clearly mark each drill point. Take time to verify your measurements—correcting mistakes now is much easier than after drilling begins.
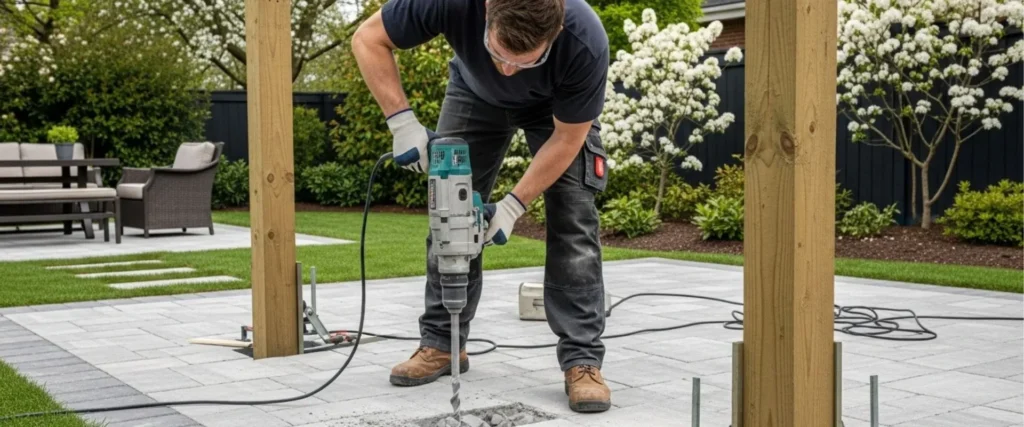
4. Drilling Anchor Holes
Put on safety glasses and gloves before starting this step. Using your hammer drill with a masonry bit, drill holes at each marked location. The hole diameter should match your anchor specifications—typically 1/2 inch for most pergola installations.
Drill slowly and steadily to avoid cracking the pavers. The hole depth should extend through the paver and into the concrete base beneath. Most installations require holes 3-4 inches deep total.
Clean out drill debris using a vacuum or compressed air. Any remaining debris can prevent anchors from seating properly and reduce holding strength.
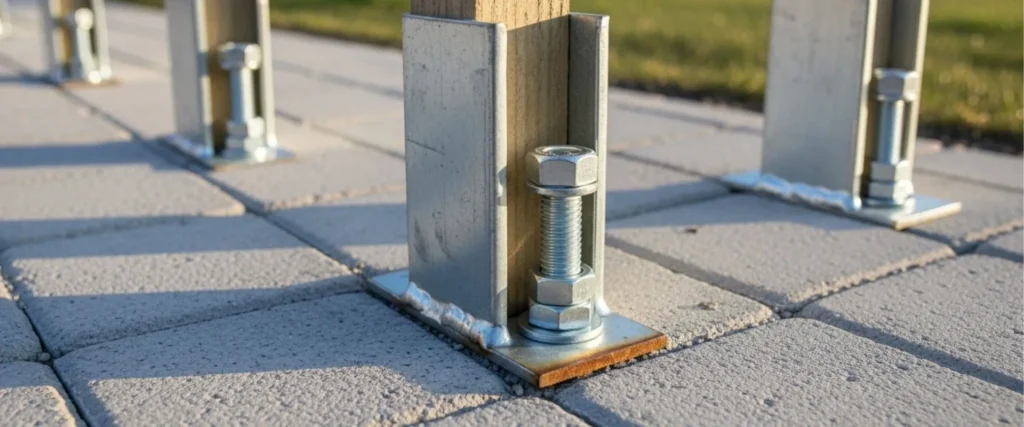
5. Installing the Anchors
Insert your concrete anchors into each drilled hole. Wedge anchors are ideal for this application because they expand against the concrete base, creating maximum holding power. Tap anchors gently with a hammer until they sit flush with the paver surface.
Apply a small amount of construction adhesive around each anchor before final installation. This extra step helps seal the connection and prevents water infiltration that could cause freeze-thaw damage.
6. Securing the Pergola Posts
Position your pergola posts or base plates over the installed anchors. Thread washers and nuts onto each anchor bolt, then hand-tighten initially. Use your level to ensure each post is perfectly plumb before final tightening.
Tighten anchor nuts gradually in a cross pattern, similar to tightening wheel lugs on a car. This approach ensures even pressure distribution and prevents binding. Check that posts remain level throughout the tightening process.
7. Adding Pergola Wind Protection
Once your posts are securely anchored, consider additional pergola wind protection measures. Cross-bracing between posts significantly increases structural stability, especially in areas prone to strong winds.
If your pergola design includes a roof or canopy, ensure these elements are also properly secured. Loose roof panels can create dangerous uplift forces during storms.
Professional Installation vs. DIY
While securing pergolas can be a rewarding DIY project, some situations call for professional installation. Complex designs, challenging site conditions, or local permit requirements may make professional installation the smarter choice.
Wood Kingdom West offers expert pergola installation throughout Long Island. Our experienced team handles everything from site preparation to final inspection, ensuring your pergola meets all safety requirements and building codes.
Consider professional installation if you’re uncomfortable using power tools, lack experience with masonry work, or simply want the peace of mind that comes with expert installation.
Maintenance Tips for Anchored Pergolas
Proper maintenance keeps your anchored pergola safe and beautiful for years to come. Inspect anchor points annually, looking for signs of loosening, corrosion, or damage. Tighten any loose bolts and replace corroded hardware immediately.
Check that pavers around anchor points remain level and stable. Settling or frost heave can affect anchor performance over time. Address any paver movement quickly to prevent anchor failure.
Apply fresh sealant around anchor points every few years to prevent water infiltration. This simple maintenance step prevents costly anchor replacement and extends your pergola’s lifespan.
Common Installation Mistakes to Avoid
Many DIY pergola installations fail due to preventable mistakes. Using incorrect anchor types is the most common error; standard concrete screws lack the holding power needed for outdoor structures.
Insufficient hole depth is another frequent problem. Shallow anchors can pull out under load, creating dangerous conditions. Always follow manufacturer specifications for hole depth and diameter.
Skipping the level check during installation leads to crooked posts that stress the entire structure. Take time to verify that each post is perfectly plumb before final tightening.
Transform Your Outdoor Space with Confidence
Anchoring a pergola to pavers requires careful planning and attention to detail, but the results are worth the effort. A properly secured pergola provides years of outdoor enjoyment while adding significant value to your property.
Ready to create your dream outdoor space? Contact Wood Kingdom West offers comprehensive backyard paver installation tips and professional pergola installation services throughout Long Island. Contact us today to discuss your outdoor living goals and discover how we can help transform your backyard into the perfect retreat.
Whether you choose DIY installation or professional service, proper anchoring ensures your pergola will stand strong for decades to come. Your family deserves a safe, beautiful outdoor space, and with the right anchoring techniques, that’s exactly what you’ll have.
Frequently Asked Questions
Can I anchor a pergola to pavers without drilling into concrete?
Surface-mounted options exist, but don’t provide adequate stability for permanent installations. Proper anchoring requires a connection to the concrete base beneath your pavers.
How deep should pergola anchors go into concrete?
Most installations require anchors to penetrate at least 2-3 inches into the concrete base beneath your pavers. Check local building codes for specific requirements in your area.
What size anchors do I need for my pergola?
Anchor size depends on your pergola’s dimensions and local wind loads. Most residential pergolas use 1/2-inch diameter anchors, but larger structures may require 5/8-inch or 3/4-inch anchors.
Do I need a permit to anchor a pergola to pavers?
Permit requirements vary by location. Check with your local building department before starting installation. Many areas require permits for permanent outdoor structures.
How often should I check my pergola anchors?
Inspect your pergola anchors at least once per year, preferably in spring before severe weather season. Look for loose bolts, corrosion, or other signs of wear.